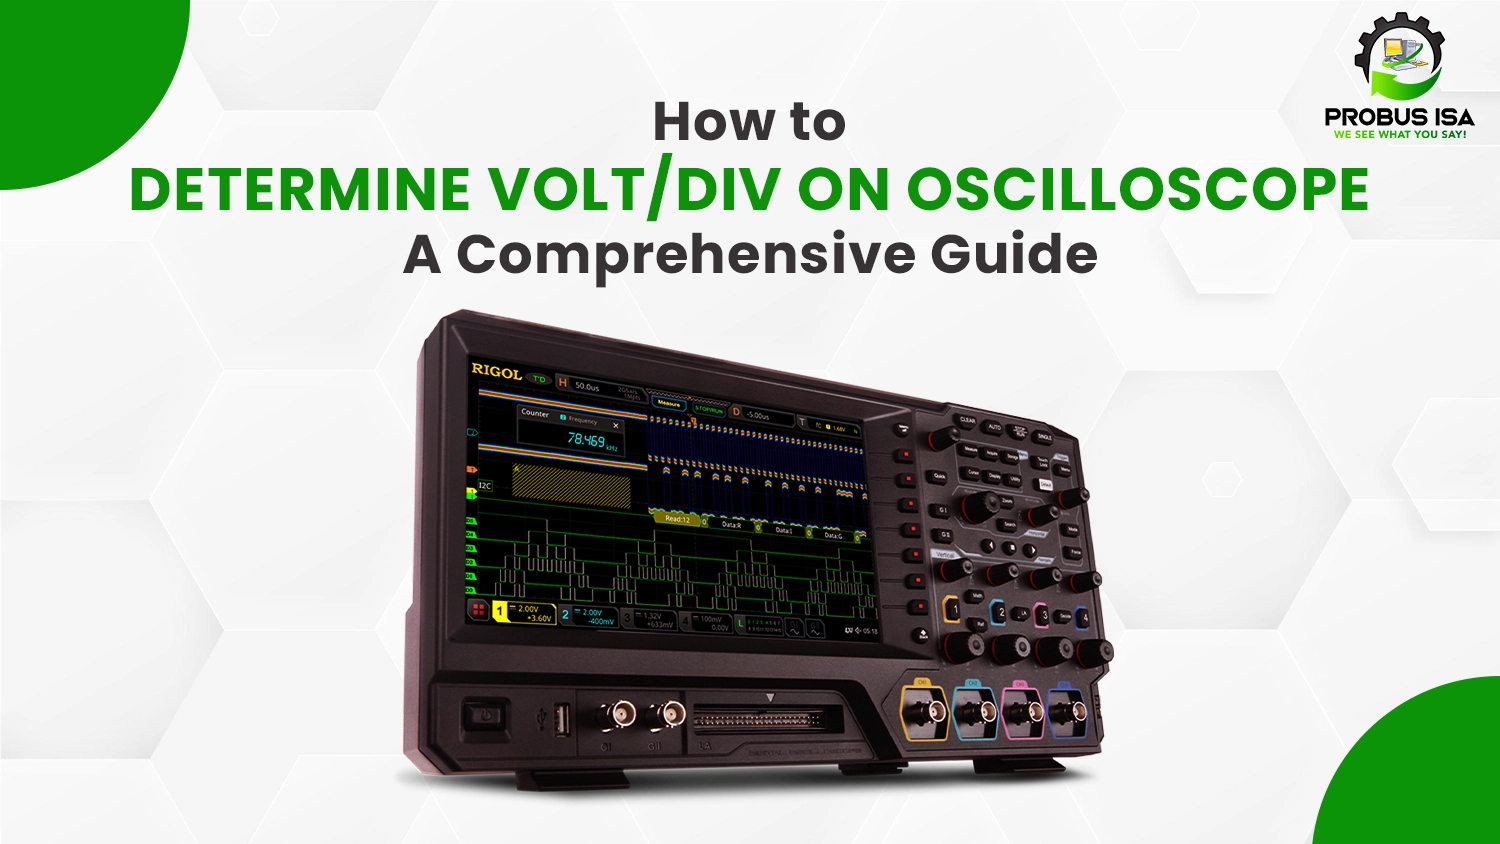
An oscilloscope is one of the most crucial instruments in any electronics enthusiast’s or engineer’s tool. It gives a visual picture of electrical signals and helps analyze waveforms, troubleshoot circuits, and understand signals’ behavior. At its core is the volt/div setting, it is the key control for how to determine volt/div and how it is scaled and then displayed on the screen.
In using this setting, it is very crucial to understand how to properly use it. Whether one is looking at small signal fluctuations or observing high voltage waveforms, knowing the right scaling factor to vary the size of the waveform allows the signal to fit well in the display so that the analysis can be done properly.
Let’s focus on the essential components found in all oscilloscopes that are the most beneficial when starting. ProbusISA examines the basic systems of an oscilloscope to measure and adjust the volt/div setting, helping you build a solid foundation for electronic explorations.
System Controls of Oscilloscopes
The best way to use an oscilloscope is by determining the type of it. Among the two types of oscilloscope, the measurement techniques are almost the same because of the common controlling system components.
There are three basic components in every oscilloscope. The vertical system, the horizontal system, and the trigger system. For using an oscilloscope, you just need to set these three elements to operate the right signals.
The Vertical Control
The vertical system controls the up-and-down movement of the signal on the oscilloscope screen. This is where you set the volt/div setting, which determines how much voltage each vertical division represents.
It helps you to see the waveform correctly or zoom in with more detail so that the signal will look larger or smaller on the screen when you increase or decrease the volt/div. The vertical position knob enables you to move the waveform up and down so it can align for easy viewing.
Simply, the vertical control adjusts the height of the signal and helps on the voltage details.
The Horizontal Control
The horizontal system manages the left-to-right movement of the waveform on the oscilloscope screen. Where the vertical system focuses on voltage, the horizontal control focuses on time. The time/div setting determines how much time each horizontal division represents, thus setting the speed at which the waveform is displayed.
The horizontal control complements the vertical system when determining the voltage of a signal. This is to ensure you see enough cycles of the waveform to measure it properly. If the signal looks too stretched or compressed, the time/div setting can be adjusted to display it at a scale that works for your needs in terms of voltage measurement.
The Trigger System
The trigger system stabilizes the waveform so it doesn’t drift across the screen and is clear for measurement. For voltage analysis, the stable waveform is crucial in order to count divisions of the signal and understand RMS voltage.
Setting the trigger level to the exact point on the signal, be it a rising or falling edge, allows an oscilloscope to “lock in” onto a waveform. This allows easy focusing on the characteristics of the voltage. If it is badly triggered, it will have an erratic behavior and might be harder to figure out the voltage.
How to Use Oscilloscope to Measure Voltage
The volts/div control allows you to specify how many volts are represented by each vertical increment of the grid overlay on the screen. You can also zoom in and out along the y-axis.
An oscilloscope displays a waveform of the voltage signal on its screen, by which you can determine volts/div. Following are the simple steps that can be used to do this.
- Know the Signal Amplitude
Before you alter the volt/div setting on an oscilloscope, you must know about the signals you are measuring and the amplitude you want to analyze. If you expect a peak-to-peak voltage of 10 V, then make sure your volt/div setting can show this range in its entirety without going off-screen.
- Begin with High Volt/Div Setting
Start with a higher volt/div value, such as 5 V/div or 10 V/div, to avoid overloading the screen with an oversized signal. This will make the waveform smaller vertically, so you can see the entire signal even if it is much larger than expected.
- Gradually decrease the volt/div setting
Once the waveform is readable, decrease the volts/div settings in increments to expand your view of the signal amplitude. For example, roll from 10 V/div down to 2 V/div. This makes little details stand out and increases your ability to measure your signal’s voltage. Stopping when the waveform does not have a part sticks off the top or side of the screen.
- Making a Measurement on the Scope Grid
Count the number of vertical divisions (or boxes) the waveform covers, from its peak to its trough. Multiply this number by the current volts/div setting to determine the signal’s peak-to-peak voltage. For example, if the signal covers 4 divisions at 2 V/div, then the peak-to-peak voltage is 4 × 2 = 8 V.
- Fine-Tune for Analysis
For a detailed examination of the waveform, such as identifying noise or small variation, decrease the volt/div further to zoom in on parts of the waveform. This is necessary if the wave is too large or needed for a broader view.
The Basic Measurements of Oscilloscopes
Oscilloscopes are invaluable tools in electronics. They can measure and visualize a wide range of signal properties. While they are often associated with analyzing voltage, their functionality extends far beyond this. In this section, we’ll explore how to measure various parameters using an oscilloscope, providing a comprehensive understanding of its capabilities.
- Measuring Voltage
The most basic measurement you can make with an oscilloscope is voltage. By setting the appropriate volts/div on the vertical system, you can measure the peak-to-peak voltage or the RMS voltage for AC signals.
Then, simply count the vertical divisions spanned by the signal and multiply by the volts/div setting. The outcome of this allows you to access the amplitude and strength of your signal.
- Measurement of Time and Frequency
The time-domain parameters, such as the period and frequency of a signal, can also be measured by the oscilloscopes. In the horizontal system, by using time/div, you can modify the display to show either one or more cycles of the waveform.
- To calculate the period, count how many divisions make a full cycle, then multiply this with a time/div setup.
- You can also find frequency with:
Frequency = 1/Period
This is very useful when you are analyzing signals in circuits that contain oscillators, communication systems, or timing components.
- Measuring Phase Difference
If you are working with multichannel systems, oscilloscopes can measure the phase difference between two waveforms. You can display both waveforms together and use the time/div scale to measure the time shift between their peaks.
The phase difference is calculated as:
Phase Difference (θ) = (Time Delay / Period) × 360°
This helps determine synchronization and latency in complicated systems.
- Determination of Shape and Quality of Signal
In addition to numerical, oscilloscopes give the visual determination of signal shape. You can catch anomalies like noise, distortion, or glitches. There are also features like overshoot, ringing, or symmetry in the waveform that tell you something about the functioning of circuits like amplifiers, filters, or links in communications.
- Determination of Rise and Fall Time
For digital signals, the rise time fast a signal goes from low to high and fall time from high to low are very important measurements. Most modern oscilloscopes can automatically make these measurements or you can use cursors to measure by placing one cursor at 10% of the amplitude and another at 90%.
- Automatic and Cursor-Based Measurements
Most modern oscilloscopes come with automatic measurement capabilities for parameters such as mean voltage, frequency, duty cycle, and more. For manual measurements, you can use cursors to pinpoint exact values on the waveform, offering flexibility and precision.
These basic measurements will now allow you to fully exercise the capabilities of an oscilloscope. Whether or not you’re troubleshooting some circuit, designing a new system, or validating the integrity of signals, using an oscilloscope becomes more than a simple device for measuring voltages in time.
The Right Way to Master the Use of Oscilloscopes
You may want to get better at using oscilloscopes in a classroom, lab, or training where accuracy and knowledge of how signals behave are important. Whether you’re mastering how to determine volt/div or any measurement in a basic or complicated system, the oscilloscope allows you to visually capture and measure electrical signals to understand the characteristics of waveforms and accurately measure values such as voltage, frequency, and phase difference skills that are relevant for both educational and professional life.
Final Words
Oscilloscope core controls, including the adjustments of volt/div, time/div, and trigger systems, makes it possible for users to adapt the display of their needs through signals. The more you practice, the easier you will find the usage of these settings for accurate measurements.
As you apply these skills in a wide range of situations, whether measuring voltage in a simple circuit or analyzing the phase difference in complex systems, your technical abilities and problem-solving skills will improve!